Einleitung
Pi-hole bietet standardmäßig kein DoT (DNS over TLS), also verschlüsselte Übertragung unserer Anfragen an den DNS-Server.
Das wollen wir mit dem Zusatzprogramm unbound realisieren, zudem werden wir hier auch gleich DNSSEC aktivieren (und nicht im Pi-hole selbst), um Authentizität und Integrität von DNS-Antworten zu prüfen.
Das ist nicht zwingend notwendig, aber ein nice to have.
Als Anhaltspunkte dienen uns die Wiki Seiten:
https://docs.pi-hole.net/guides/dns/unbound/
https://wiki.archlinux.org/title/Unbound
Für die DNSSEC Validierungen gibt es das Paket dnssec-anchors und es verwendet die Server von https://data.iana.org/root-anchors/
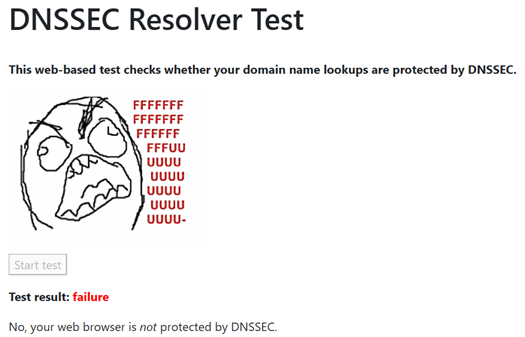
DNSSEC testen können wir auf der Webseite:
https://wander.science/projects/dns/dnssec-resolver-test/
Aktuell haben wir kein DNSSEC aktiviert:
Unbound installieren und einrichten
Unbound installieren wir mit yay. Die Abhängigkeiten werden automatisch mit installiert. dnssec-anchors war bereits installiert:
yay -S unbound

yay -Q |grep anchor
Nach der Installation benennen wir die originale Config-Datei um:
- sudo mv /etc/unbound/unbound.conf /etc/unbound/unbound.conf.orig
Die Log-Datei legen wir auch gleich an, und setzen die Berechtigungen für den unbound Benutzer:
- sudo touch /etc/unbound/unbound.log
- sudo chown unbound:unbound /etc/unbound/unbound.log
Jetzt befüllen wir die Conf-Datei mit dem Inhalt aus der Pi-hole Dokumentation, und ändern diese gleich für uns ab. Wir ergänzen auch gleich den Eintrag für DNSSEC (trust-anchor-file)
- sudo vim /etc/unbound/unbound.conf
server:
    # If no logfile is specified, syslog is used
    logfile: "/etc/unbound/unbound.log"
    log-time-ascii: yes
    verbosity: 1
    interface: 127.0.0.1
    port: 5335
    do-ip4: yes
    do-udp: yes
    do-tcp: yes

    # May be set to yes if you have IPv6 connectivity
    do-ip6: yes

    # You want to leave this to no unless you have *native* IPv6. With 6to4 and
    # Terredo tunnels your web browser should favor IPv4 for the same reasons
    prefer-ip6: no

    # Use this only when you downloaded the list of primary root servers!
    # If you use the default dns-root-data package, unbound will find it automatically
    #root-hints: "/var/lib/unbound/root.hints"

    # DNSSEC
    trust-anchor-file: /etc/unbound/trusted-key.key

    # Trust glue only if it is within the server's authority
    harden-glue: yes

    # Require DNSSEC data for trust-anchored zones, if such data is absent, the zone becomes BOGUS
    harden-dnssec-stripped: yes

    # Don't use Capitalization randomization as it known to cause DNSSEC issues sometimes
    # see https://discourse.pi-hole.net/t/unbound-stubby-or-dnscrypt-proxy/9378 for further details
    use-caps-for-id: no

    # Reduce EDNS reassembly buffer size.
    # IP fragmentation is unreliable on the Internet today, and can cause
    # transmission failures when large DNS messages are sent via UDP. Even
    # when fragmentation does work, it may not be secure; it is theoretically
    # possible to spoof parts of a fragmented DNS message, without easy
    # detection at the receiving end. Recently, there was an excellent study
    # >>> Defragmenting DNS - Determining the optimal maximum UDP response size for DNS <<<
    # by Axel Koolhaas, and Tjeerd Slokker (https://indico.dns-oarc.net/event/36/contributions/776/)
    # in collaboration with NLnet Labs explored DNS using real world data from the
    # the RIPE Atlas probes and the researchers suggested different values for
    # IPv4 and IPv6 and in different scenarios. They advise that servers should
    # be configured to limit DNS messages sent over UDP to a size that will not
    # trigger fragmentation on typical network links. DNS servers can switch
    # from UDP to TCP when a DNS response is too big to fit in this limited
    # buffer size. This value has also been suggested in DNS Flag Day 2020.
    edns-buffer-size: 1232

    # Perform prefetching of close to expired message cache entries
    # This only applies to domains that have been frequently queried
    prefetch: yes

    # One thread should be sufficient, can be increased on beefy machines. In reality for most users running on small networks or on a single machine, it should be unnecessary to seek performance enhancement by increasing num-threads above 1.
    num-threads: 1

    # Ensure kernel buffer is large enough to not lose messages in traffic spikes
    so-rcvbuf: 1m

    # Ensure privacy of local IP ranges
    private-address: 192.168.42.0/24
    private-address: 192.168.0.0/16
    private-address: 169.254.0.0/16
    private-address: 172.16.0.0/12
    private-address: 10.0.0.0/8
    private-address: fd00::/8
    private-address: fe80::/10

    # Ensure no reverse queries to non-public IP ranges (RFC6303 4.2)
    private-address: 192.0.2.0/24
    private-address: 198.51.100.0/24
    private-address: 203.0.113.0/24
    private-address: 255.255.255.255/32
    private-address: 2001:db8::/32
- Zusätzlich fügen wir noch ein paar Performance Tuning Parameter ein:
######## Performance #########

# More cache memory, rrset=msg*2 | Default: 4m, 4m
msg-cache-size: 32m
rrset-cache-size: 64m

# Time  to  live [minimum|maximum] for RRsets and messages in the cache | Default: 0, 86400
cache-min-ttl: 3600
cache-max-ttl: 86400

# Serve old responses from cache with a TTL of 0 in the response without waiting for the actual resolution to finish | Default: no, 0
serve-expired: yes
serve-expired-ttl: 86400

# Fetch DNSKEYs earlier (DNSSEC): More cpu usage, less latency | Default: no
prefetch-key: yes

# Helps to reduce the query rate towards targets that get a very high nonexistent name lookup rate | Default: no
aggressive-nsec: yes

## Privacy | Default: no, no
hide-identity: yes
hide-version: yes
- Als nächsten fügen wir die Einträge für DoT ein. Wir verwenden hier die cloudflare Server
######## DNS over TLS #########

tls-upstream: yes
tls-cert-bundle: "/etc/ssl/cert.pem"

# Use an upstream DNS-over-TLS forwarder and do not fall back to cleartext if that fails
forward-zone:
name: "."
forward-tls-upstream: yes

# use DNS-over-TLS forwarder
forward-first: no

# do NOT send direct
# the hostname after "#" is not a comment, it is used for TLS checks:
# cloudflare
forward-addr: 1.1.1.1@853#cloudflar-dns.com
forward-addr: 1.0.0.1@853#cloudflar-dns.com
- sudo systemctl enable unbound
- sudo systemctl start unbound
Für das Testen orientieren wir uns wieder am Wiki: https://wiki.archlinux.org/title/Unbound#DNSSEC_validation
Der Test sollte uns jetzt ein secure zurückmelden:
unbound-host -vDr go.dnscheck.tools

Da anscheinend alles funktioniert, werden wir die Upstream-Server deaktivieren und unseren unbound-Server unter Settings à DNS eintragen.
Zur Sicherheit starten wir Pi-hole noch einmal neu und testen dann einfach ob wir Webseiten ansurfen können.
- sudo systemctl restart pihole-FTL
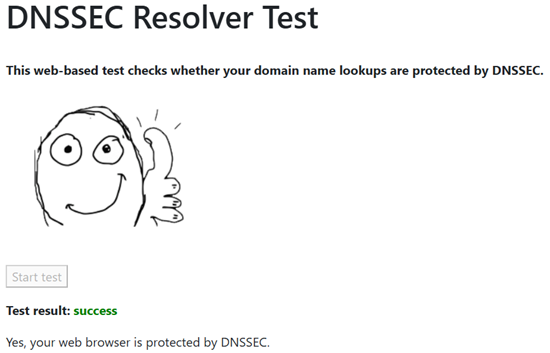
Zum Testen surfen wir gleich die DNSSEC Webseite an und starten den Test:
https://wander.science/projects/dns/dnssec-resolver-test/
Fazit
Unser Pi-hole läuft jetzt über unseren unbound-Server, der die Anfragen verschlüsselt an die cloudflare-Server schickt. Prinzipiell können wir hier alle DNS-Server als forward-addr eintragen, sofern sie TLS unterstützen.
DNSSEC funktioniert ebenfalls, wir benötigen es im Moment allerdings nicht. Trotzdem haben wir eine funktionierende Installation, falls wir es einmal benötigen.